Creating a React and TypeScript Project with CRA3
Creating a React and TypeScript project with linting and automatic code formatting has never been easier. In this post we’ll do this with Create React App 3.
Creating the project
Let’s run the following command to create the project:
npx create-react-app app --template typescript- The
npxtool temporarily installs thecreate-react-appnpm package and uses it to create our project - We’ve called our project app
- We’ve also specified
--typescript, which is the bit that tells the tool to set the project up with TypeScript.
The tool will take a minute or so to create the project.
Linting in CRA3
ESLint is the most popular linter in the React community and is automatically installed into a CRA project. CRA3 also configures ESLint to lint TypeScript code - neat!
Note that TSLint has been a popular alternative to ESLint for linting TypeScript code but is now deprecated. More information can be found here.
Configuring Visual Studio Code to lint TypeScript code
CRA has already installed ESLint and configured it for us but we need to tell VS Code to lint TypeScript code. We can do this in our project in a settings.json file with the following settings in a folder called .vscode:
{ "eslint.validate": [ "javascript", "javascriptreact", { "language": "typescript", "autoFix": true }, { "language": "typescriptreact", "autoFix": true } ]}The most popular linting extension in VS Code is ESLint and is published by Dirk Baeumer:

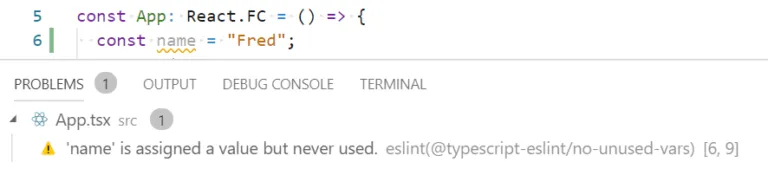
Linting errors will now be underlined as well as appearing in the Problems list:
If we want to configure the linting rules, we first add a file called .eslintrc.json in project root folder with the following content:
{ "extends": "react-app"}This file defines the rules that ESLint executes and this simply configures ESLint to execute all the rules that are configured in CRA. We can add additional rules we want to run in a rules field:
{ "extends": "react-app", "rules": { "no-debugger": "warn" }}All the available ESLint rules can be found here.
Adding automatic code formatting
Some of the linting rules that deal with the format of our code (such as semi colons at the end of statements) can be automatically dealt with by a tool like Prettier.
We can install Prettier by executing the following command in the Terminal:
npm install prettier --save-devPrettier can take responsibility for the style rules off of ESLint by using the eslint-config-prettier and eslint-plugin-prettier ESLint plugins.
eslint-config-prettierdisables ESLint rules that conflict with Prettiereslint-plugin-prettieris a ESLint rule that formats code using Prettier
These can be installed using the following command:
npm install eslint-config-prettier eslint-plugin-prettier --save-devThe following prettier settings also need to be added to .eslintrc.json:
{ "extends": ["react-app", "prettier"], "plugins": ["prettier"], "rules": { "prettier/prettier": "error" }}The formatting rules can be specified in a .prettierrc file in the project root folder. Here’s an example prettier configuration:
{ "printWidth": 80, "singleQuote": true, "semi": true, "tabWidth": 2, "trailingComma": "all"}More information can be found on prettier configuration here.
We can get VS Code to automatically format code in a file when we save it by adding the editor.formatOnSave flag to our settings.json file:
{ "eslint.validate": [ "javascript", "javascriptreact", { "language": "typescript", "autoFix": true }, { "language": "typescriptreact", "autoFix": true } ], "editor.formatOnSave": true}The most popular VS Code prettier extension is Prettier - Code formatter and is published by Esben Petersen:

That’s it – we now have a React and TypeScript project with linting and automatic code formatting!
Comments
Austin August 8, 2019
Thanks! This helped me a lot 🙂
Zappy November 6, 2019
Simple and Precise. Thanks a lot.
Learn React with TypeScript - 3rd Edition
NewA comprehensive guide to building modern React applications with TypeScript. Learn best practices, advanced patterns, and real-world development techniques.
View on Amazon