

Taking Stripe Payments with Angular 2 and ASP.NET Core
Stripe is a service that allows you to very easily take payments online. In this post, I’ll go through how to take a payment via stripe using an Angular 2 frontend and an ASP.NET Core backend.
Sign up to Stripe
Firstly, we need to sign up for a stripe account. You can signup for a free test account here
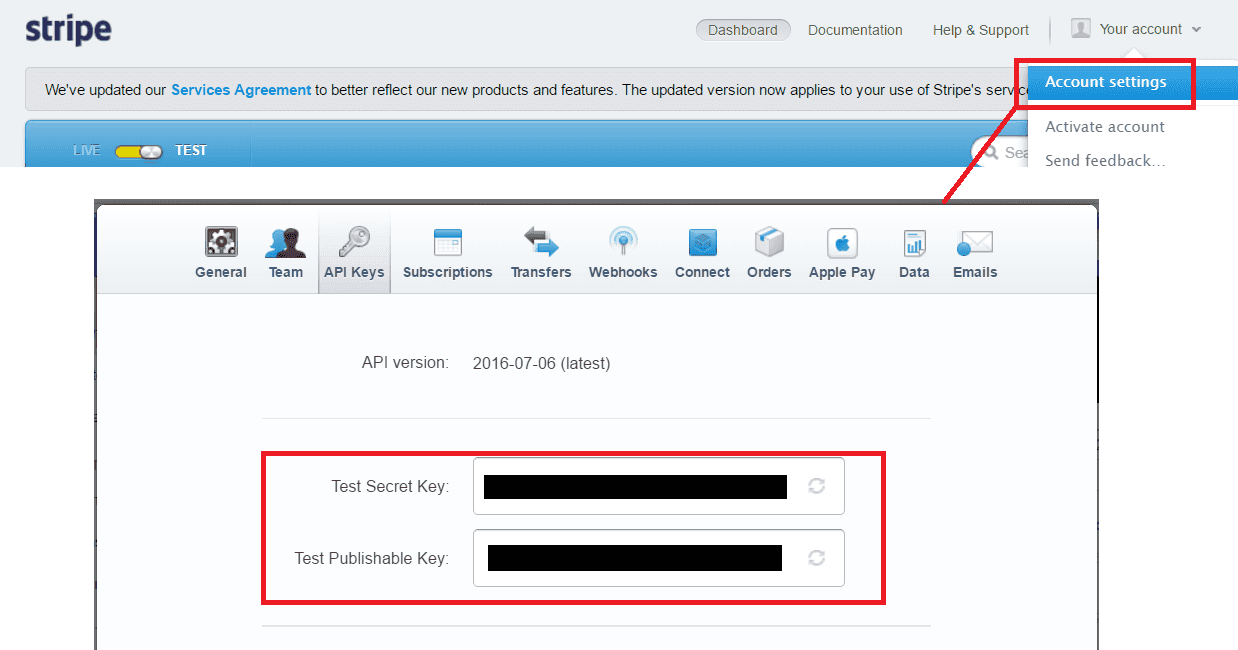
After you have signed up, we need the Secret and Publishable keys. You can get these from Your account > Account settings > API Keys
Frontend Page
Let’s build the frontend first, using an Angular 2 component.
We are going to use stripe checkout which is super easy to implement and protects us from any PCI headaches (as long as our site runs on HTTPS).
First, we need to add a reference to the standard stripe checkout JavaScript in our server side ASP.NET Core view (line 3). This adds the global variable StripeCheckout which we’ll reference in our angular component. Note that we can not add this script into our angular component template because angular will remove it.
<app asp-prerender-module="ClientApp/dist/main-server">Loading...</app>

<script src="https://checkout.stripe.com/checkout.js"></script>

<script src="~/dist/vendor.js" asp-append-version="true"></script>
@section scripts {
<script src="~/dist/main-client.js" asp-append-version="true"></script>
}
Now let’s add our angular payment component …
Here’s the simple markup (referencing bootstrap classes) which allows a user to buy 3 products, a T-shirt, some trainers or some jeans. Each button will invoke a function in our component code to take the payment via stripe. We show whether the payment has been successful or not in the last div in the markup, referencing a property called takePaymentResult.
<div class="form-group">
  <button type="submit" class="btn btn-default" (click)="buyTShirt()">
    T-Shirt (£10)
  </button>
  <button type="submit" class="btn btn-default" (click)="buyTrainers()">
    Trainers (£15)
  </button>
  <button type="submit" class="btn btn-default" (click)="buyJeans()">
    Jeans (£20)
  </button>
</div>
<div class="form-group" *ngIf="takePaymentResult">
  <p>Payment Result: {{takePaymentResult}}</p>
</div>
Our component code is below …
Our 3 button handlers at are the bottom of the code and simply call into openCheckout() passing the product name, amount (in pence) and a callback to get invoked when we receive a token from stripe.
openCheckout() references the global variable StripeCheckout from checkout.js. Firstly we configure StripeCheckout, passing our publishable key and then we open the stripe payment form passing in our product and amount for the transaction.
After the user enters their credit card details and presses the Pay button, these details will be sent to stripe to initiate the payment. Stripe will then return a token and our callback (takePayment()) will be invoked.
takePayment() will call our ASP.NET Core API (/api/stripepayment) using angular’s http service. This is where the stripe payment will be processed - we’ll implement this in a minute.
The status from the /api/stripepayment API response is put in takePaymentResult which will be presented in the UI by angular.
import { Component } from "@angular/core";
import { Http, Response, Headers, RequestOptions } from "@angular/http";
import "rxjs/add/operator/catch";
import "rxjs/add/operator/toPromise";

@Component({
  selector: "stripepayment",
  template: require("./stripepayment.component.html")
})
export class StripePaymentComponent {
  http: Http;

  takePaymentResult: string;

  constructor(http: Http) {
    this.http = http;
  }

  takePayment(productName: string, amount: number, token: any) {
    let body = {
      tokenId: token.id,
      productName: productName,
      amount: amount
    };
    let bodyString = JSON.stringify(body);
    let headers = new Headers({ "Content-Type": "application/json" });
    let options = new RequestOptions({ headers: headers });

    this.http
      .post("/api/stripepayment", bodyString, options)
      .toPromise()
      .then(res => {
        this.takePaymentResult = res.json().status;
      })
      .catch(error => {
        this.takePaymentResult = error.message;
      });
  }

  openCheckout(productName: string, amount: number, tokenCallback) {
    let handler = (<any>window).StripeCheckout.configure({
      key: "your_stripe_publishable_key",
      locale: "auto",
      token: tokenCallback
    });

    handler.open({
      name: "Our Shop",
      description: productName,
      zipCode: false,
      currency: "gbp",
      amount: amount,
      panelLabel: "Pay {{amount}}",
      allowRememberMe: false
    });
  }

  buyTShirt() {
    this.openCheckout("T-Shirt", 1000, (token: any) =>
      this.takePayment("T-Shirt", 1000, token)
    );
  }
  buyTrainers() {
    this.openCheckout("Trainers", 1500, (token: any) =>
      this.takePayment("Trainers", 1500, token)
    );
  }
  buyJeans() {
    this.openCheckout("Jeans", 2000, (token: any) =>
      this.takePayment("Jeans", 2000, token)
    );
  }
}
Web API
OK, on to our web API that processes the stripe payment …
First, we need to bring in stripe.net via nuget - it makes processing the payment very simple.
Below is the full API controller and the API request model, StripePaymentRequest …
First we tell stripe our secret key (line 7). We then setup the stripe charge object, setting the token, amount and description (to the product name). We also set our payment reference in the MetaData dictionary so that we tie the payment in our app to the payment in stripe.
The charge is then made and the result (which includes whether the payment has been successful) is passed back down in the response.
[Route("api/[controller]")]
public class StripePaymentController : Controller
{
    [HttpPost]
    public JsonResult Post([FromBody]StripePaymentRequest paymentRequest)
    {
        StripeConfiguration.SetApiKey("your_stripe_secret_key");

        var myCharge = new StripeChargeCreateOptions();
        myCharge.SourceTokenOrExistingSourceId = paymentRequest.tokenId;
        myCharge.Amount = paymentRequest.amount;
        myCharge.Currency = "gbp";
        myCharge.Description = paymentRequest.productName;
        myCharge.Metadata = new Dictionary<string, string>();
        myCharge.Metadata["OurRef"] = "OurRef-" + Guid.NewGuid().ToString();

        var chargeService = new StripeChargeService();
        StripeCharge stripeCharge = chargeService.Create(myCharge);

        return Json(stripeCharge);
    }

    public class StripePaymentRequest
    {
        public string tokenId { get; set; }
        public string productName { get; set; }
        public int amount { get; set; }
    }
}
Test it!
You can test different scenarios using stripe’s test credit card numbers here.
If you to learn about using React with ASP.NET Core you might find my book useful:

