Fluent Validation in an ASP.NET Core Web API
Fluent Validation allows you to separate validation rules from your model and helps you structure the rules so that they are nice and readable. The rules are also super easy to test.
Some existing code
Let’s say we have started to build a web api to add new customers:
[Route("api/Customers")]
public class CustomersController : Controller
{
    private CustomerData customerData;
    public CustomersController(CustomerData customerData)
    {
        this.customerData = customerData;
    }

    [HttpGet("{customerId}", Name = "CustomerGet")]
    public IActionResult Get(Guid customerId)
    {
        var customer = customerData.GetCustomerById(customerId);
        if (customer == null) return NotFound();

        return Ok(customer);
    }

    [HttpPost]    public IActionResult Post([FromBody]NewCustomer newCustomer)    {        Guid customerId = customerData.AddCustomer(newCustomer);        var addedCustomer = customerData.GetCustomerById(customerId);        var url = Url.Link("CustomerGet", new { customerId = customerId });        return Created(url, addedCustomer);    }}
Our NewCustomer model is:
public class NewCustomer
{
    public string CustomerType { get; set; }
    public string Title { get; set; }
    public string FirstName { get; set; }
    public string CustomerName { get; set; }
    public string EmailAddress { get; set; }
}
We also have an action filter which will handle validation on the models and return a 400 if they are invalid:
public class ValidatorActionFilter : IActionFilter
{
    public void OnActionExecuting(ActionExecutingContext filterContext)
    {
        if (!filterContext.ModelState.IsValid)
        {
            filterContext.Result = new BadRequestObjectResult(filterContext.ModelState);
        }
    }

    public void OnActionExecuted(ActionExecutedContext filterContext)
    {

    }
}
Startup.ConfigureServices looks like this to wire everything up:
public void ConfigureServices(IServiceCollection services)
{
    services.AddMvc(opt =>
    {
        opt.Filters.Add(typeof(ValidatorActionFilter));
    });
    services.AddScoped<CustomerData>();
}
So, let’s say we want to make CustomerName a required field in the POST method on the newCustomer model. We could use a standard data annotation:
[Required]
public string CustomerName { get; set; }
However, we’re not going to do this. Instead, we’re going to use Fluent Validation to keep our validation logic separate from the model and go on to add more complex rules …
Getting started with Fluent Validation
First we need to bring this library in via nuget. The package that needs adding is FluentValidation.AspNetCore. We can then wire this up in Startup.ConfigureServices by adding AddFluentValidation() to AddMVC():
services.AddMvc(opt =>
{
    opt.Filters.Add(typeof(ValidatorActionFilter));
}).AddFluentValidation(fvc => fvc.RegisterValidatorsFromAssemblyContaining<Startup>());```


Now let us add a validation to ensure `CustomerName` is populated on the `newCustomer` model using the power of Fluent Validation:`

```csharp
public class CreateCustomerValidator : AbstractValidator<NewCustomer>
{
    public CreateCustomerValidator()
    {
        RuleFor(m => m.CustomerName).NotEmpty();
    }
}
As you can see, this rule is nice and readable. This class is also picked up automatically with the work we have already done in Startup.ConfigureServices.
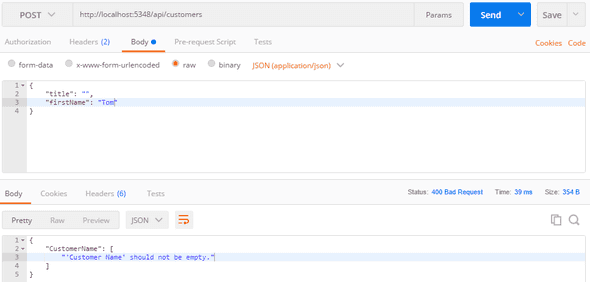
To check this is working, let’s try to POST a customer without a surname to our API - we should get a 400 with a nice error message in the response body:

Adding some more simple rules
There’s quite a few built in rules in Fluent Validation, including a rule to validate an email address. So, let’s use this:
public class CreateCustomerValidator : AbstractValidator<NewCustomer>
{
    public CreateCustomerValidator()
    {
        RuleFor(m => m.CustomerName).NotEmpty();
        RuleFor(m => m.EmailAddress).EmailAddress();    }
}
We can also add multiple rules on a field. Let’s add minimum and maximum length rules on CustomerName:
public class CreateCustomerValidator : AbstractValidator<NewCustomer>
{
    public CreateCustomerValidator()
    {
        RuleFor(m => m.CustomerName).NotEmpty().MinimumLength(3).MaximumLength(100);        RuleFor(m => m.EmailAddress).EmailAddress();
    }
}
Again, this is nice and readable.
Conditional rules
So far the rules have been nice and simple. Let’s deal with more complex rules, starting with conditional rules. For example, a rule to ensure the first name is populated if the customer type is a person:
public class CreateCustomerValidator : AbstractValidator<NewCustomer>
{
    public CreateCustomerValidator()
    {
        RuleFor(m => m.CustomerType).NotEmpty();        RuleFor(m => m.CustomerName).NotEmpty().MinimumLength(3).MaximumLength(100);
        RuleFor(m => m.EmailAddress).EmailAddress();
        RuleFor(m => m.FirstName).NotEmpty().When(m => m.CustomerType.ToLower() == "person");    }
}
As well as implementing this rule, we’ve also made CustomerType a required field. What about controlling the error message? At the moment we just get: ‘First Name’ should not be empty. Let’s change the message to: ‘First Name’ must be filled in for customers of type ‘Person’. All we need to do is chain a WithMessage() on the rule:
RuleFor(m => m.FirstName).NotEmpty().When(m => m.CustomerType.ToLower() == "person")
    .WithMessage("'First Name' must be populated in for customers of type 'Person'");
Custom rules
Lastly, we’ll look at a custom rule to ensure the company type is “Person” or “Company”. The rule will be called ValidCustomerType and invoked like below:
RuleFor(m => m.CustomerType).NotEmpty().ValidCustomerType();We define the rule like so:
public class CustomerTypeValidator : PropertyValidator
{
    public CustomerTypeValidator(): base("Customer type {PropertyValue} is not a valid type")
    {
    }
    protected override bool IsValid(PropertyValidatorContext context)
    {
        string customerType = (string)context.PropertyValue;
        if (customerType.ToLower() == "person" || customerType.ToLower() == "company")
            return true;

        return false;
    }
}
We also need to define this validator in a static class (along with any other custom rules):
public static class CustomValidatorExtensions
{
    public static IRuleBuilderOptions<T, string> ValidCustomerType<T>(
        this IRuleBuilder<T, string> ruleBuilder)
    {
        return ruleBuilder.SetValidator(new CustomerTypeValidator());
    }
}
Unit tests
I introduced this post by saying how simple these rules are to test. The following tests are a few we could write against CreateCustomerValidator using Fluent Validation helpers ShouldHaveValidationErrorFor and ShouldNotHaveValidationErrorFor:
public class CreateCustomerValidatorTests
{
    [Fact]
    public void WhenCustomerNameNull_ShouldHaveError()
    {
        var sut = new CreateCustomerValidator();
        sut.ShouldHaveValidationErrorFor(m => m.CustomerName, null as string);
    }
    [Fact]
    public void WhenHaveCustomerName_ShouldHaveNoError()
    {
        var sut = new CreateCustomerValidator();
        sut.ShouldNotHaveValidationErrorFor(m => m.CustomerName, "Smith");
    }
    [Fact]
    public void WhenCustomerTypeNotPersonOrCompany_ShouldHaveError()
    {
        var sut = new CreateCustomerValidator();
        sut.ShouldHaveValidationErrorFor(m => m.CustomerType, "Animal");
    }
    [Fact]
    public void WhenCustomerTypeIsPerson_ShouldHaveNoError()
    {
        var sut = new CreateCustomerValidator();
        sut.ShouldHaveValidationErrorFor(m => m.CustomerType, "Person");
    }
}
Conclusion
As you can see Fluent Validation is a great library for creating validation rules outside your model. I’d encourage you to check out the project on Github.
If you to learn about using React with ASP.NET Core you might find my book useful:

